
Hôm nay mình sẽ hướng dẫn các bạn cách để tạo một field upload image trong categories hoặc trong taxonomies.
Để chống việc các bạn chỉ vào lấy code mà không đọc bài, mình sẽ chia nhỏ đoạn code thành từng đoạn cụ thể nhé.
Có rất nhiều cách để tạo cách field này, bạn có thể sử dụng ACF cho nhanh, hoặc có thể dùng cách dưới này nếu không muốn thêm plugin cho site mình nhé. ACF là một trong những plugin hỗ trợ code mạnh mẽ nhất cho dev hiện nay.
Tạo class để tránh trường hợp trùng tên function
Dùng code dưới đây để tạo class và cấu trúc file.
class PTTUAN_TAX_META {
public function __construct() {
//
}
Thêm meta data term
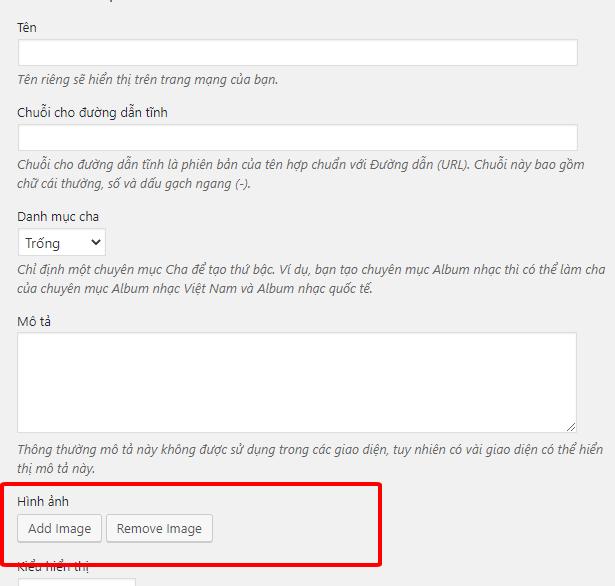
Để có thể thêm 1 field add image như hình trên, bạn thêm đoạn code dưới đây.
wp_enqueue_media();
}
function add_category_image ( $taxonomy ) { ?>
<div class="form-field term-group">
<label for="category-image-id"><?php _e('Hình ảnh', 'pttuan'); ?></label>
<input type="hidden" id="category-image-id" name="category-image-id" class="custom_media_url" value="">
<div id="category-image-wrapper"></div>
<p>
<input type="button" class="button button-secondary ct_tax_media_button" id="ct_tax_media_button" name="ct_tax_media_button" value="<?php _e( 'Add Image', 'pttuan' ); ?>" />
<input type="button" class="button button-secondary ct_tax_media_remove" id="ct_tax_media_remove" name="ct_tax_media_remove" value="<?php _e( 'Remove Image', 'pttuan' ); ?>" />
</p>
</div>
<?php
}
Save category image vào term meta
Bạn dùng đoạn code dưới đây nhé.
if( isset( $_POST['category-image-id'] ) && '' !== $_POST['category-image-id'] ){
$image = $_POST['category-image-id'];
add_term_meta( $term_id, 'category-image-id', $image, true );
}
}
Như vậy là xong phần tạo và save field image của category được tạo mới. Nhưng chưa xong đâu nhé còn nhiều bước lắm, các bạn kiên nhẫn đọc hết bài nhé.
Tạo form update field image đối với các category đã tạo.
Cũng tương tự như bước tạo field đối với tạo mới category, bước này cũng tạo field tương tự nhưng áp dụng cho bên trong các category đã được tạo trước đây.
<tr class="form-field term-group-wrap">
<th scope="row">
<label for="category-image-id"><?php _e( 'Hình ảnh', 'pttuan' ); ?></label>
</th>
<td>
<?php $image_id = get_term_meta ( $term -> term_id, 'category-image-id', true ); ?>
<input type="hidden" id="category-image-id" name="category-image-id" value="<?php echo $image_id; ?>">
<div id="category-image-wrapper">
<?php if ( $image_id ) { ?>
<?php echo wp_get_attachment_image ( $image_id, 'thumbnail' ); ?>
<?php } ?>
</div>
<p>
<input type="button" class="button button-secondary ct_tax_media_button" id="ct_tax_media_button" name="ct_tax_media_button" value="<?php _e( 'Add Image', 'pttuan' ); ?>" />
<input type="button" class="button button-secondary ct_tax_media_remove" id="ct_tax_media_remove" name="ct_tax_media_remove" value="<?php _e( 'Remove Image', 'pttuan' ); ?>" />
</p>
</td>
</tr>
<?php
}
Cũng tương tự, chúng ta cũng phải save/update field này vào term meta.
Save/update field image category.
if( isset( $_POST['category-image-id'] ) && '' !== $_POST['category-image-id'] ){
$image = $_POST['category-image-id'];
update_term_meta ( $term_id, 'category-image-id', $image );
} else {
update_term_meta ( $term_id, 'category-image-id', '' );
}
}
Thêm code trên là bạn hoàn thành các bước thêm, lưu, update field image category rồi đó.
Bây giờ chỉ cần một chút js để lấy giá trị, xuất giá trị nữa thôi là xong.
Script dùng trong tạo field image category
<script>
jQuery(document).ready( function($) {
function ct_media_upload(button_class) {
var _custom_media = true,
_orig_send_attachment = wp.media.editor.send.attachment;
$('body').on('click', button_class, function(e) {
var button_id = '#'+$(this).attr('id');
var send_attachment_bkp = wp.media.editor.send.attachment;
var button = $(button_id);
_custom_media = true;
wp.media.editor.send.attachment = function(props, attachment){
if ( _custom_media ) {
$('#category-image-id').val(attachment.id);
$('#category-image-wrapper').html('<img class="custom_media_image" src="" style="margin:0;padding:0;max-height:100px;float:none;" />');
$('#category-image-wrapper .custom_media_image').attr('src',attachment.url).css('display','block');
} else {
return _orig_send_attachment.apply( button_id, [props, attachment] );
}
}
wp.media.editor.open(button);
return false;
});
}
ct_media_upload('.ct_tax_media_button.button');
$('body').on('click','.ct_tax_media_remove',function(){
$('#category-image-id').val('');
$('#category-image-wrapper').html('<img class="custom_media_image" src="" style="margin:0;padding:0;max-height:100px;float:none;" />');
});
$(document).ajaxComplete(function(event, xhr, settings) {
var queryStringArr = settings.data.split('&');
if( $.inArray('action=add-tag', queryStringArr) !== -1 ){
var xml = xhr.responseXML;
$response = $(xml).find('term_id').text();
if($response!=""){
// Clear the thumb image
$('#category-image-wrapper').html('');
}
}
});
});
</script>
<?php }
Như vậy là hoàn thành phần Function, kế tiếp sẽ là hook các function này vào những vị trí cần thiết.
Hook cần dùng để tạo field image category
Chúng ta sẽ sử dụng các hook dưới đây nhé.
add_action( 'category_add_form_fields','add_category_image',10, 2 );
add_action( 'created_category','save_category_image',10, 2 );
add_action( 'category_edit_form_fields','update_category_image',10, 2);
add_action( 'edited_category','updated_category_image' );
add_action( 'admin_enqueue_scripts','load_media');
add_action( 'admin_footer','add_script');
}
Và kết thúc bằng đoạn code này
$PTTUAN_TAX_META = new PTTUAN_TAX_META();
$PTTUAN_TAX_META -> init();
}
Tèng teng, như vậy là xong đối với tạo field image category cho wordpress mà không cần dùng đến ACF nhé, trước mình có một bài viết về Cách tạo khung soạn thảo wysiwyg trong category product, các bạn có thể tham khảo thêm nhé.
Toàn bộ code sẽ như thế này ^^
À cái này là áp dụng cho post mặc định của wordpress, vậy cho các custom post type thì sẽ như thế nào. Bạn chỉ cần thay thế toàn bộ category thành product_cat là được nhé.
Ngoài ra thì sửa function load_media thành đoạn code dưới đây
if( ! isset( $_GET['taxonomy'] ) || $_GET['taxonomy'] != 'product_cat' ) {
return;
}
wp_enqueue_media();
}
Vậy là hoàn thành phần backend, kế tiếp sẽ cho nó hiển thị ra bên ngoài frontend.
Hiển thị hình ảnh ngoài front end.
Bạn dùng code sau vào vị trí mún hiển thị
$category = get_category( get_query_var( 'cat' ) );
$cat_id = $category->cat_ID;
// Get the image ID for the category
$image_id = get_term_meta ( $cat_id, 'category-image-id', true );
// Echo the image
echo wp_get_attachment_image ( $image_id, 'large' );
Có gì không hiểu đặt câu hỏi cho mình nhé.